
Shower Waterproofing Kit from Mapei Australia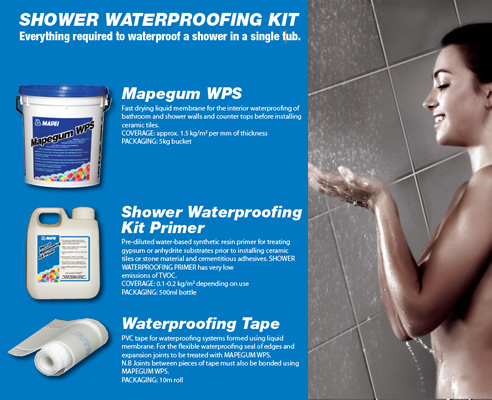 Everything required to waterproof a shower in a single tub: Mapegum WPSFast drying liquid membrane for the interior waterproofing of bathroom and shower walls and counter tops before installing ceramic tiles. COVERAGE: approx. 1.5 kg/m2 per mm of thickness PACKAGING: 5kg bucket Shower Waterproofing Kit Primer Pre-diluted water-based synthetic resin primer for treating gypsum or anhydrite substrates prior to installing ceramic tiles or stone material and cementitious adhesives. SHOWER WATERPROOFING PRIMER has very low emissions of TVOC. COVERAGE: 0.1-0.2 kg/m2 depending on use PACKAGING: 500ml bottle Waterproofing Tape PVC tape for waterproofing systems formed using liquid membrane. For the flexible waterproofing seal of edges and expansion joints to be treated with MAPEGUM WPS. N.B Joints between pieces of tape must also be bonded using MAPEGUM WPS. PACKAGING: 10m roll Step 1 1) Fill in any cracks or voids in the substrate with a suitable filler. Do not use the MAPEGUM WPS to fill voids or even out surface irregularities. 2) Do not apply the products at less than 5OC 3) Prime all porous substrates and gypsum plaster with the ready to use SHOWER WATERPROOFING KIT PRIMER. Allow to dry. DO NOT ADD ANY ADDITIONAL WATER TO THE PRIMER Step 2 4) The Mapei WATERPROOFING TAPE is required to form an elastic reinforcement at the following locations; internal wall angles and board joints, around pipe penetrations and at junctions between wall and bath/shower tray. 5) Carefully cut the Mapei Waterproof Tape to the correct size using a sharp knife or scissor. 6) Where a shower tray, GRP shower base or bath is used thoroughly degrease the edges to be waterproofed with a suitable solvent such as acetone. Lightly abrade the contract area and wipe again with the solvent. Do not prime the GRP surfaces. 7) Using a brush apply a narrow strip of Mapei Mapegum WPS (slightly wider than the Mapei Waterproof Tape) to the areas listed above(including shower trays and bases). Cut the scrim edge from the Waterproof Tape leaving the grey rubber centre. Ensure that the water proof Tape sits on the shower base, cut edge outermost, but does not protrude beyond the thickness of the tiled finish and its adhesive bed. Step 3 8) Whilst the coating is still wet push the Mapei Waterproof Tape firmly into position in these areas. Ensure that no air voids are trapped beneath the= Waterproof Tape and that it lays flat with no folds. Pay special attention to the three way angle where the two walls meet at the base. 9) Using a brush or roller apply an even coat of Mapegum WPS to the walls and then to the floors (where there is no shower tray). Allow the membrane to dry for approximately 1 to 2 hours then apply a second coat to all areas. The ideal dry film thickness is between 1 and 2mm. 10) Tiles may be fixed using a suitable Mapei adhesive from 24 hours after application of the waterproofing membrane.
|
07 3276 5000 180 Viking Drive, Wacol, Brisbane, QLD, 4076
|
Related News Articles
 Vinyl Sheet Installation System for
 Mosaic Pool Tile Waterproofing &
 Commercial Hybrid Sealants & Adhesives
 Interior Levelling Compound - Ultraplan
 Epoxy Resin-Based Chemical Anchor
 Recover Returned Concrete from Mixer
 Low VOC Deformable Cementitious Adhesive
 Ready-Made Grout for Luxury Vinyl Tiles
 Timber Flooring Over Moisture Vapour
 Install LVT Planks Over Existing Ceramic
 Ceramic Tiles and Stone on Balconies
 Vinylester Anchors for Structural Loads
 Epoxy Moisture Barrier for Cementitious
 Thixotropic Mortar for Concrete Repair
 Pre-blended Controlled Shrinkage Mortar
 Universal Floor and Wall Adhesive from
 Fast-Grip Adhesive for High-Performance
 Water Based Epoxy Primer for Green
 Hybrid Polyurethane Waterproofing
 Interior Fibre-Reinforced Levelling
 |
 |
Home | About/Services | News Lounge | News Archive | Product Archive | Tender News | Testimonials | Conditions of Use | Privacy Policy | Stats
![]()
![]()
![]()
![]()
© SPEC-NET