NEWS ARTICLE ARCHIVESCeramic Panel Installation from Stoneclip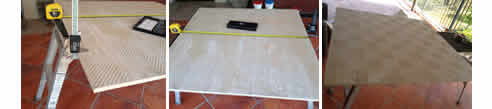 The above three images are showing the 1000 mm x 1000 mm x 13.49 mm thick Ceramic panel - Floor is handmade 400 mm x 400 mm Terra Cotta tiles. They highlight he large size of the panel and the indents in the back of the panel at 150 mm in from each edge to accept the Slimline Supportclips. The benefit of these clips is such that you can hang the panel in Mechanical format or you can use a cement based glue or epoxy to stiffen the panels against damage in the people zone (up to 1.5mm high). 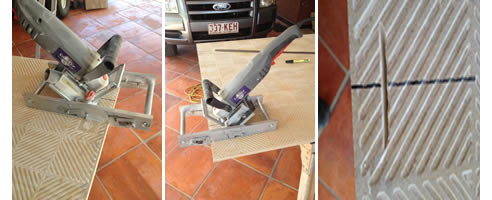 The above shows the Slimline Supportclip cutter that is set to put the indents into the back of the panel at a 3 mm joint spacing. In this photo the cutter is in position to do the top indent. The second image is another photo of the cutter showing the simple lines of the machine. The last is a photo of the bottom indent in the panel. This indent is always set at 22mm from the bottom edge of the panel. 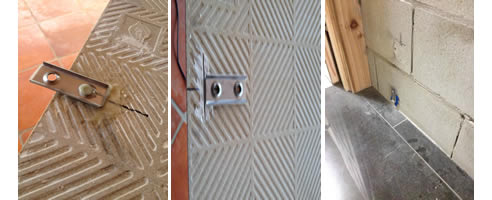 These images are showing the top Slimline Supportclip having been epoxied into place in the top indent of the panel. This is the indent that effects the joint width of the installed panels. It can vary from 35mm - 45mm from the top edge in placement, meaning that the joint width can go from zero to 10 mm wide. The Supportclip here has been epoxied in place with a 24 HR EPOXY WHICH GIVE BETTER STRENGTH THAN THE 1 HR VARITIES. Also shown is the dry fitting of the bottom Slimline Supportclip which has the top tounge of the clip cut off so as it will not stop the clip from fitting snugly against the Ceramic panel when being installed. The third image above shows the same bottom clip installed in place on the substrate with packers behind it to allow for the out of plumb wall. This clip is installed at 22mm up from the starting level of the bottom of the panels. In actual fact you can do the same as this for the top panel when installing it - BY PUTTING THE TOP CUT IN UPSIDE DOWN AND 22MM FROM THE TOP EDGE, this way you can picture hang this panel. 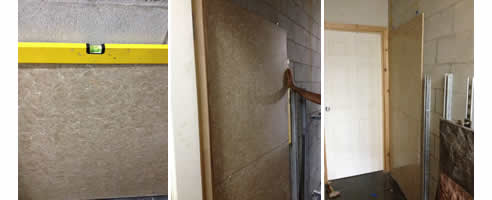 These final three images show the 1st panel installed plumb and LEVEL & the 2nd panel installed with the 3 mm spacers visible. They stay in place till you have installed the top screws and plumbed the panel and then they can be removed but best left till whatever you use to set the botton indents is set, be it Silicone or epoxy. ALL OF THE LOAD OF THE WEIGHT OF THE PANEL IS CARRIED BY THE TOP FIXINGS and no load is tranferred downwards after the spacers are removed. The last image is showing a finished photo of the 2 x 1000mm x 1000mm x 13mm panels in place. The installation of the panels took -10 minutes the previous day to secure the 4 top clips in the 2 panels with epoxy after marking them up and 20 minutes to install the 2 panels with 2 men the next day. The cost of the clips with the screws is $4.50 each. |
 |
 |
Home | About/Services | News Lounge | News Archive | Product Archive | Tender News | Testimonials | Conditions of Use | Privacy Policy
![]()
![]()
![]()
![]()
© 2022 SPEC-NET