NEWS ARTICLE ARCHIVES
Garden Wall Installation from Modular Wall Systems
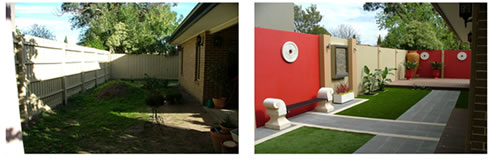
How to install a garden wall within days
In this article, we summarise the typical construction method of two types of garden wall: a traditional rendered brick wall and a rendered finish modular garden wall. The building of a traditional rendered brick wall can take up to several weeks depending on circumstances. A modular garden wall generally takes a few days to install.
What is involved with constructing a traditional rendered brick wall?
Unless you venture into constructing the garden wall yourself, the process typically involves employing a brick layer who will:
1. Dig a trench to lay concrete strip footing. The weight of brick wall generally requires a substantial strip footing. Digging machinery is used.
2. Dry the footing for several days before the brick laying can commence.
3. Lay out the wall as it is intended, and mark any desired openings such as gates. Laying out the wall is usually done using a string line.
4. Laying the bricks.
5. Render the wall; to help create a visually pleasing effect.
How long does it take to construct a traditional brick garden wall?
When planning garden wall construction, bear in mind that you will need to:
- Source a reliable bricklayer that is available at a time that suits you
- Source and order bricks and materials (unless provided by the brick layer). Be aware of delivery lead times between 6-8 weeks and potential delays, check with your supplier. Explore the difference in price between ordering the materials yourself and ordering them through your brick layer.
- Count on a construction time of approximately 8 days to several weeks, depending on the size and specifications of the wall
- The machinery required to dig the trench for the strip footing, and the replacement of soil during the process can cause damage to your current garden design. Discuss this with your brick layer in advance, so you know what to expect.
What is involved with installing a modular garden wall?
Modular garden walls are generally installed within days. The lightweight modular panel have been designed with the DIY handyman in mind, aiming to take away the need for brick layers, expensive excavation or machinery, big strip footings and council approval (in most cases).
Using a modular garden wall system, you no longer need to worry about unreliable sub-contractors, messy work sites and blow outs in labor costs which can accompany traditional brick wall construction.
A Modular Wall Systems garden wall requires only basic installation tools and consists of the following elements:
- Wall Posts
- Wall Panels
- Wall capping
- Post capping
Complete your garden wall installation within days using a Modular Wall Systems and by following the 4 easy steps:
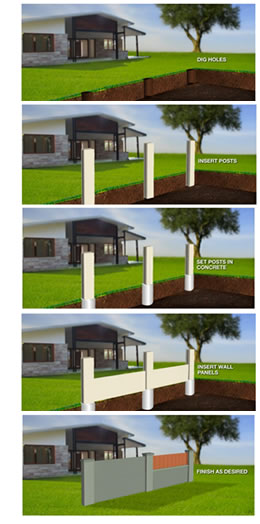
1. Dig post holes in the right place to the recommended depth- no heavy machinery is required
2. Place posts into the holes (they are manufactured to replicate the dimensions of traditional columns) and pour concrete, ensuring posts are plumb and straight
3. Drop wall panels into place and apply capping
4. Finish as desired - with acrylic paint, texture paint, acrylic render finish and even stone cladding to seamlessly match the overall look and feel of the home or landscaping project.
Modular Wall Systems' garden walls can be finished with slat infills, gates, lighting, letterboxes and feature items.
For those with specific questions, Modular Wall Systems- dedicated customer service team are on hand to help.
Call 1300 556 957 today. Alternatively, ask your local landscaper about Modular Wall Systems.
|
|