
2 Piece Shadowline Skirting Installation from Intrim Mouldings The Intrim 2 Piece Shadowline System Wanting to use Shadowline in your interior but won't have the flooring down prior to plasterboard? Intrim's 2 Piece Shadowline System is used when retro fitout is required, allowing you to install your plasterboard and skirting prior to the flooring. Watch our animated installation video to see how it works! You can also read our detailed installation details here; As a summary, when installing the SK801 we recommend you place a packer of your expected thickness flooring under the SK802 and place the SK801 on top, with a 10mm spacer between SK802 and SK801 in the groove. Fix the SK801 in place. It also ensures you can cut the two pieces to the correct length at the same time as installing the SK801. You can then leave the SK802 in position (sitting on the floor and tack or tape in place) until it is time to install the flooring, at which time you can remove the SK802, install the flooring and replace the SK802 after and fix in place. The base of the SK802 may need planing or scribing to maintain the 10mm groove prior to fixing in place. More detailed instructions with diagrams are below; Step one: Cut DJ800 door jamb material to required lengths with a 45-degree mitre cut to the top of stiles and each end of the head. Assemble the head and stile mitre joints with PVA glue and nails or screws (Detail A): 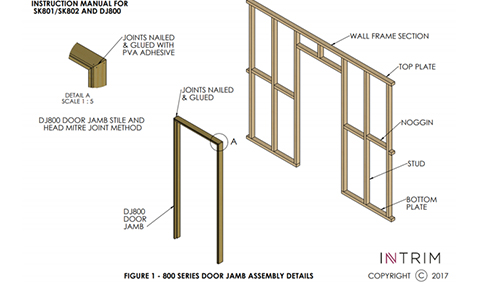 Step two: Pack opening and install DJ800 door jamb plumb and level. Take care when installing jamb material, to make sure it is fixed parallel with timber framework. Example - if framework is 90mm wide and plasterboard is 10mm thick = 90mm frame + (2 x 10mm) 2 thicknesses of plasterboard + (2 x 3.5mm) 2 thicknesses of plaster set = 117mm total width of DJ800 door jamb, therefore the difference between timber framework face and door jamb face = (117 - 90) divided by 2 = 13.5mm on both sides between the jamb face and framework face (Detail B): 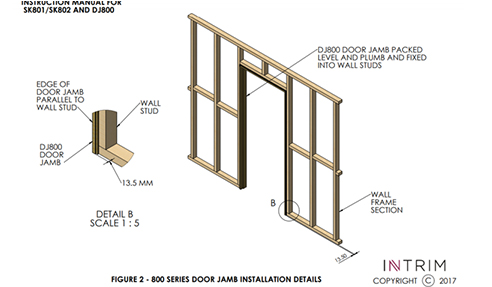 Once all DJ800 door jambs are installed, it is time to install the two-piece SK801 and SK802 skirting. Step three:Install SK801 upper ribbed portion of skirting Keep the two pieces of skirting together and cut SK801 (top portion - fixed) and SK802 (lower portion of skirting - not fixed) to required lengths to fit neatly between door jambs and internal and external corners of the framework. Cut SK801 and SK802 skirting with 45-degree mitre cuts for external corners and scribe joints for internal corners. After cutting 2 pieces to length, keep the upper and lower portion together while installing. When installing the 2-piece skirting, place a packer with the expected finished thickness of flooring on top of existing flooring and underneath the SK802 and place the SK801 on top, with a 10mm spacer in the groove between SK802 and SK801 to keep the groove consistent and fix the SK801 only in place. SK801 Skirting must be nail or screw fixed into every stud at a maximum distance of 600mm centres. As you remove the floor thickness packers from the underside of the SK802, it will now lower onto the existing floor material, leaving a large gap between the SK801 and SK802. Temporarily tack or tape SK802 in place, until it is time to install the flooring. Do not permanently fix the lower SK802 portion in place at this stage. 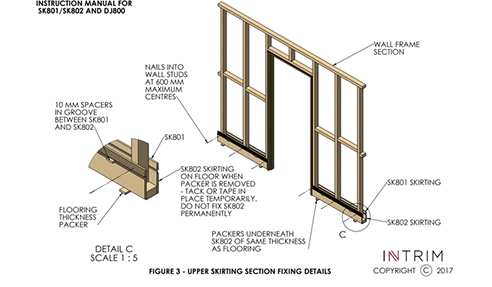 Step four: Install plasterboard sheet to the framework as per the manufacturer's specifications. Cut and fit plasterboard sheet as close as possible to the door jamb and skirting edges. It is preferable to have the factory finish plasterboard edge sitting on the top of SK801 skirting edge. 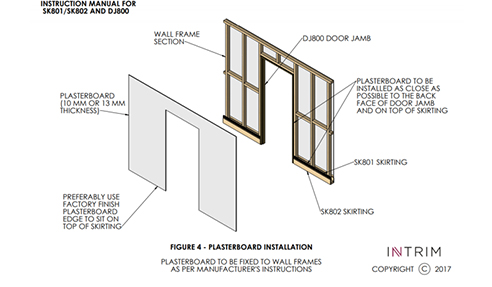 Step Five: Install all PVC stop beads (PLTB 630 - 30mm x 6mm tear off bead) to door jamb surrounds and metal perforated angles to external wall corners, taking care to cut the corners to a point to eliminate plaster set material build-up (Detail C): 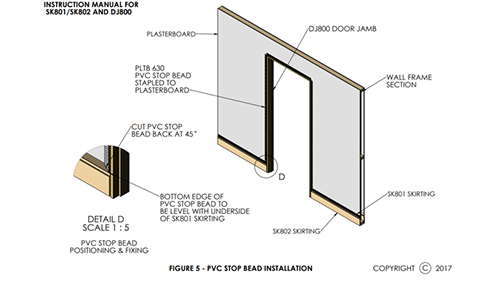 Step Six: Set all plaster joints including the joint where the bottom edge of wall plasterboard sits on top of the Shadowline skirting (SK801), using paper joint tape. All plaster set and accessories must be installed to manufacturer's specifications and instructions. 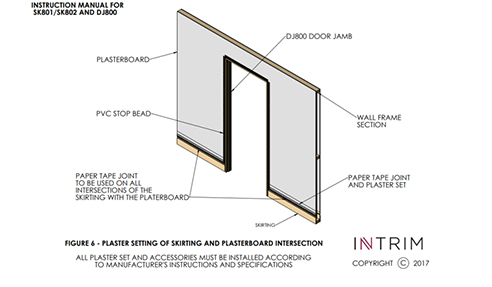 Step Seven: Apply plaster set to PVC stop beads around door jamb surrounds. All plaster set and accessories must be installed to manufacturer's specifications and instructions. 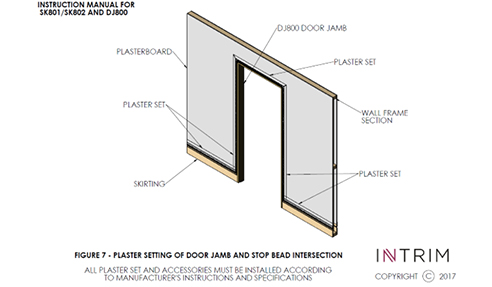 Step eight: Apply all coats of plaster set including top coats to all plaster joints and sand. Tear of PVC lip on stop bead around door jamb surrounds and it is now ready for painting. All plaster set and accessories must be installed to manufacturer's specifications and instructions. 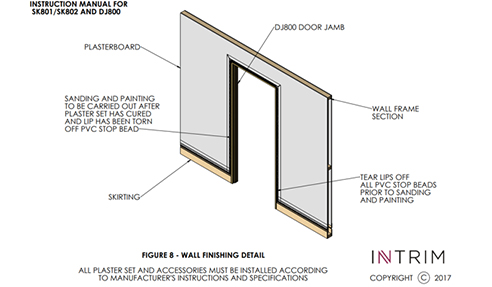 Step Nine: Remove the SK802 and install the flooring and replace the SK802 after and fix in place at every stud. The base of the SK802 may need planing or scribing to maintain the 10mm groove prior to fixing in place. The skirting is now ready for painting. 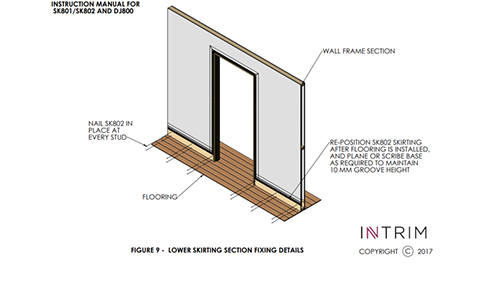 Learn more about the 2 Piece Shadowline skirting system by visiting intrimmouldings.com.au.
|
1800 622 081 14 Redbank Place, Picton, NSW, 2571
|

Related News Articles
 Types of Ceiling Panelling by Intrim
 VJ Wall and Ceiling Panelling by Intrim
 Lining Boards for Outdoor Alfresco Area
 Wainscoting for a Contemporary Apartment
 Mouldings for French Provincial Home by
 Shadowline System for Wall Skirtings by
 Timber Trims and Mouldings for Modern
 Styles of Farmhouses or Country Homes by
 Intrim Mouldings Featured in Three Birds
 Timber Mouldings for Country Cottage by
 Lakehouse Transformation Using Skirting
 Stylish Skirting Boards and Architraves
 Functional and Decorative Fixtures for
 Tattersalls Club Art Deco Inspiration
 LED Handrail Systems for Hospitals by
 Skirting Boards and Architraves at Typo
 DIY Wainscoting Kit by Intrim
 Timber Mouldings Tips By Intrim
 Curved and Textured Walls - New Cavetto
 Winter Trends Featuring Intrim Mouldings
 |
 |
Home | About/Services | News Lounge | News Archive | Product Archive | Tender News | Testimonials | Conditions of Use | Privacy Policy | Stats
![]()
![]()
![]()
![]()
© SPEC-NET