
Ideal Tiling & Grout Specifications by Laticrete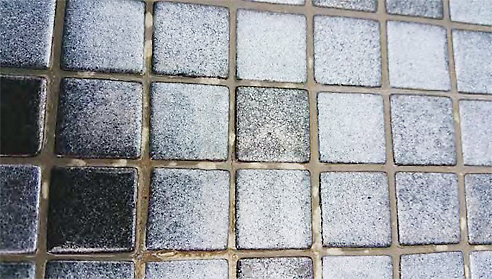 The image depicts mosaic installed with an epoxy adhesive and cementitious grout in immersed conditions. The grout is disintegrating exposing the adhesive.
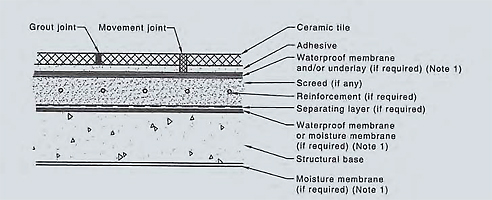
How much of the tile joint needs to be filled with grout How much of the tile joint needs to be filled with grout? Is it right to just fill any remaining space left in the grout joints after the tile laying process is complete? What if I am relying on stress absorbing grouts in the joints? Do you need to grout at all? What are the key considerations when the grout chemistry is different to the adhesive chemistry? I get these types of question on a fairly regular basis. I hope the following observations will provide some clarification. By Fred Gray, Technical Service Manager, Laticrete. I recently found myself in the middle of a robust discussion on how much space should the grout actually occupy in the joint and to what extent should the adhesive be removed from the joint during or after the fixing process. In this case, the grout was epoxy and the adhesive material was cementitious. The contractor objected to the engineer's assertions and his specification that the joints should be completely filled with epoxy grout and that the tile laying operation should be carried out in such a way to achieve this objective.
|
1800 331 012 29 Telford Street, Virginia, Qld, 4014
|


Related News Articles
 Lightweight Adhesive for Large Format
 Solvent Based Sealer for Marble by
 Lightweight Adhesive for Stone Tiles by
 Sealer for Cement Based Grout by
 Concrete Densifier for Car Parks by
 Water-Based Primer for Waterproofing
 Self-Curing Waterproofing Membrane for
 Mortar for Stone Wall Cladding by
 Silicone Sealant for Ceramic Tiles by
 Adhesive Mortar for Tile Protection by
 Oil Stain Remover for Natural Stone by
 Advantages of Single Source Systems for
 Grout for Wide Joints by Laticrete
 Uncoupling Mat for Tile Installations by
 Moisture Shield Epoxy Coating by
 Sound Isolation Protection for Tiles by
 Stain Protection for Natural Stones by
 Polymer Fortified Mortar for Masonry
 Soap Scum Remover for Natural Stone by
 Acoustical Underlayment by Laticrete
 |
 |
Home | About/Services | News Lounge | News Archive | Product Archive | Tender News | Testimonials | Conditions of Use | Privacy Policy | Stats
![]()
![]()
![]()
![]()
© SPEC-NET